Update: Before you read this post, check out my new guide on TechNet right here: https://gallery.technet.microsoft.com/How-to-Deploying-Office-e9f296fb
Today Microsoft has released the Office 2016 Deployment Tool.
This Tool allows administrators to customize and manage Office 2016 Click-to-Run deployments. It will also help administrators to manage installations sources, product/language combinations, and deployment configuration options for Office Click-to-Run.
The tool can be downloaded here: http://www.microsoft.com/en-us/download/details.aspx?id=49117&WT
Prepareing and Deploying Office 2016
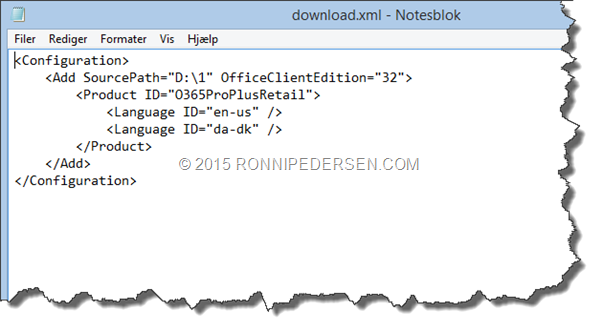
After downloading and extracting the Deployment Tool, we need to create a download.xml that is used to download or update the installation source with the latest version of Office 365 Pro Plus (2016).
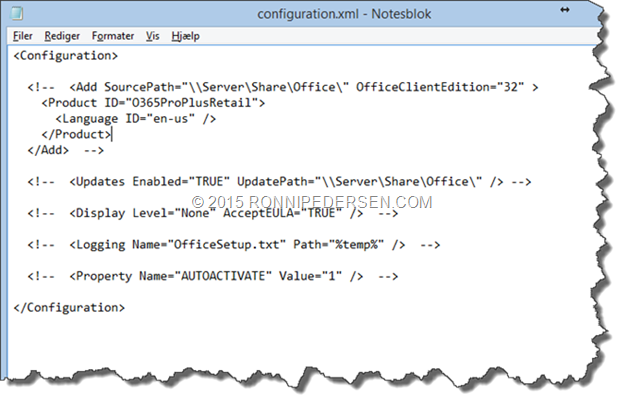
We also need to create a configuration.xml file that are used when deploying Office 2016.
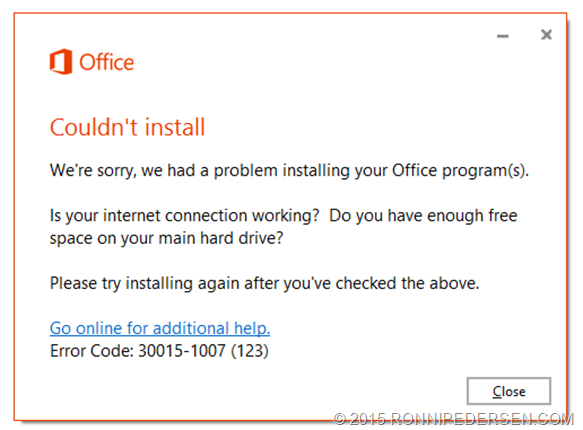
Note: When you attempt to download the Office 365 ProPlus from the Microsoft content delivery network (CDN) using the Office Deployment Tool (ODT) you might get the following error message:
This occurs when you leave the SourcePath blank in the configuration.xml. For example, your configuration.xml looks as follows:
| <Configuration> <Add SourcePath=” ” OfficeClientEdition=”32″ > <Product ID=”O365ProPlusRetail”> <Language ID=”en-us” /> </Product> </Add> </Configuration> |
To workaround this issue, you will need to specify a path (UNC or Local folder) in the SourcePath attribute of the configuration.xml file. This requirement is for /download only and not for /configure.
More info about this bug: http://blogs.technet.com/b/odsupport/archive/2015/09/22/office-365-proplus-2016-couldn-39-t-install-error-30015-1007-when-trying-to-download-using-the-office-deployment-tool-odt.aspx
Creating the Configuration files
This is how the download.xml file that I use in my lab looks like:
Note: There is a bug with the
And here is the configuration.xml file:
 As you can see, I’m downloading both the Danish and English version but I’m only deploying one language.
Here is a cool tool that will help you create the xml files you need:
http://officedev.github.io/Office-IT-Pro-Deployment-Scripts/XmlEditor.html
Running Setup
To download the latest version you need to run the following command:
Setup.exe /download download.xml
And when the download is complete you can run the following command to install Office:
Setup.exe /configure configure.xml
That’s it… Happy deployment…
/Enjoy
 |
For more updates on Deployment and Enterprise Client Managemet please follow me on Twitter: @ronnipedersen
If you want to connect via LinkedIn, you can reach me here: https://dk.linkedin.com/in/ronnipedersen |


16 Comments
Pingback: Office 2016 Released - msdigest.net - by Peter Schmidt [MVP & MCSM]
This works fine too: SourcePath=”.”
Great tip 🙂 Thanks for sharing!
Hello,
Very nice write-up! Do you know will this C2R installation method be the only available installation option with Office 2016 or will there be the normal setup.exe with Office Customization Wizard like it was with Office 2013 ?
There will be a normal MSI download also. It should be ready for download tomorrow.
I expect to released a full guide to that version within 2 weeks.
But how can i make a file so that i can selected by the install
You can’t… But you can create multiple configuration files that fits all your needs 🙂
Check out my new guide here: https://gallery.technet.microsoft.com/How-to-Deploying-Office-e9f296fb
Hi Ronni,
I’m glad to see you manage to use Office Deployment Tool in the end. In my case I’ve not been so lucky.
In fact I manage to make it work in one VM, where I use the following config to choose what applications to install:
This code worked perfectly in VM1. In fact I could see during the install process that the progress window shows only the icons of the applications being installed.
In VM2 the file simply does not work. Rather than showing the icons of the applications being installed, it shows a big OFFICE 2016 logo.
Back in VM1 I then tried to use another file to remove Word:
But that didn’t work…
Any ideas of what might be wrong?
Regards,
P.
I don’t have the answer to your problem, but I’ve just released this guide: https://gallery.technet.microsoft.com/How-to-Deploying-Office-e9f296fb/view/Reviews
Check it out 🙂
Hi
I don’t think using SoftwareMicrosoftWindowsCurrentVersionUninstallO365ProPlusRetail – en-us. is good way for Detection Rule, esspecialy for later on updates deployed by SCCM.
For me you should put SOFTWAREMicrosoftOfficeClickToRunConfigurationVersionToReport == 16.0.xxxxxxx
I agree. There are some scenarios where you want to control the version, but for customers that want to use Office as a service, and stay on the latest version, this will work just fine.
Tak for hjælpen,
På alle de MS sider jeg har fundet omkring dette emne, er der en syntaxfejl. Har derfor ikke fået downloadet noget før jeg fandt din side.
Hos MS står der : Setup.exe /download download.xml
..og ikke som du gør Setup.exe /download download.xml , som virker !!!
Mvh
Flemming
Tak for feedback 🙂
Hi,
I’m trying to deploy Office 2016, and have searched for help…your blog helped greatly until the configuration file…the one shown in the blog is all remarked out, so I couldn’t get the configuration to work (unless you meant to leave it all remarked out). Your download xml file worked flawlessly, so I wondered if your configuration file just didn’t get uploaded…or is it supposed to be blank?
Thanks…
Hi Ronnie
in your post you write:
Note: There is a bug with the
And here is the configuration.xml file:
a bug with the….. the….. ??
What’s your experience with SourcePath?
Reading your guide, I notice you don’t use any SourcePath in Configuration.xml Is Setup.exe clever enough to use the files from the Office folder automatically, or will the lack of SourcePath mean you download the needed install files from Microsoft on every install?